Posted tagged ‘wooden vise screws’
Making Wooden Screws – A Gallery
December 17, 2012


Raked leg Roubo workbench redux
December 14, 2012


BACK TO THE ROUBO BENCH
February 23, 2012So okay! I know! I’ve been screwin’ around with this project for a year or more. But I just got into other things…. You know how it is. Right? Well, anyway, I’m back at the Roubo bench project and it is the priority project of the season. So, stick around, we’ll finish this darned thing together, so to speak.
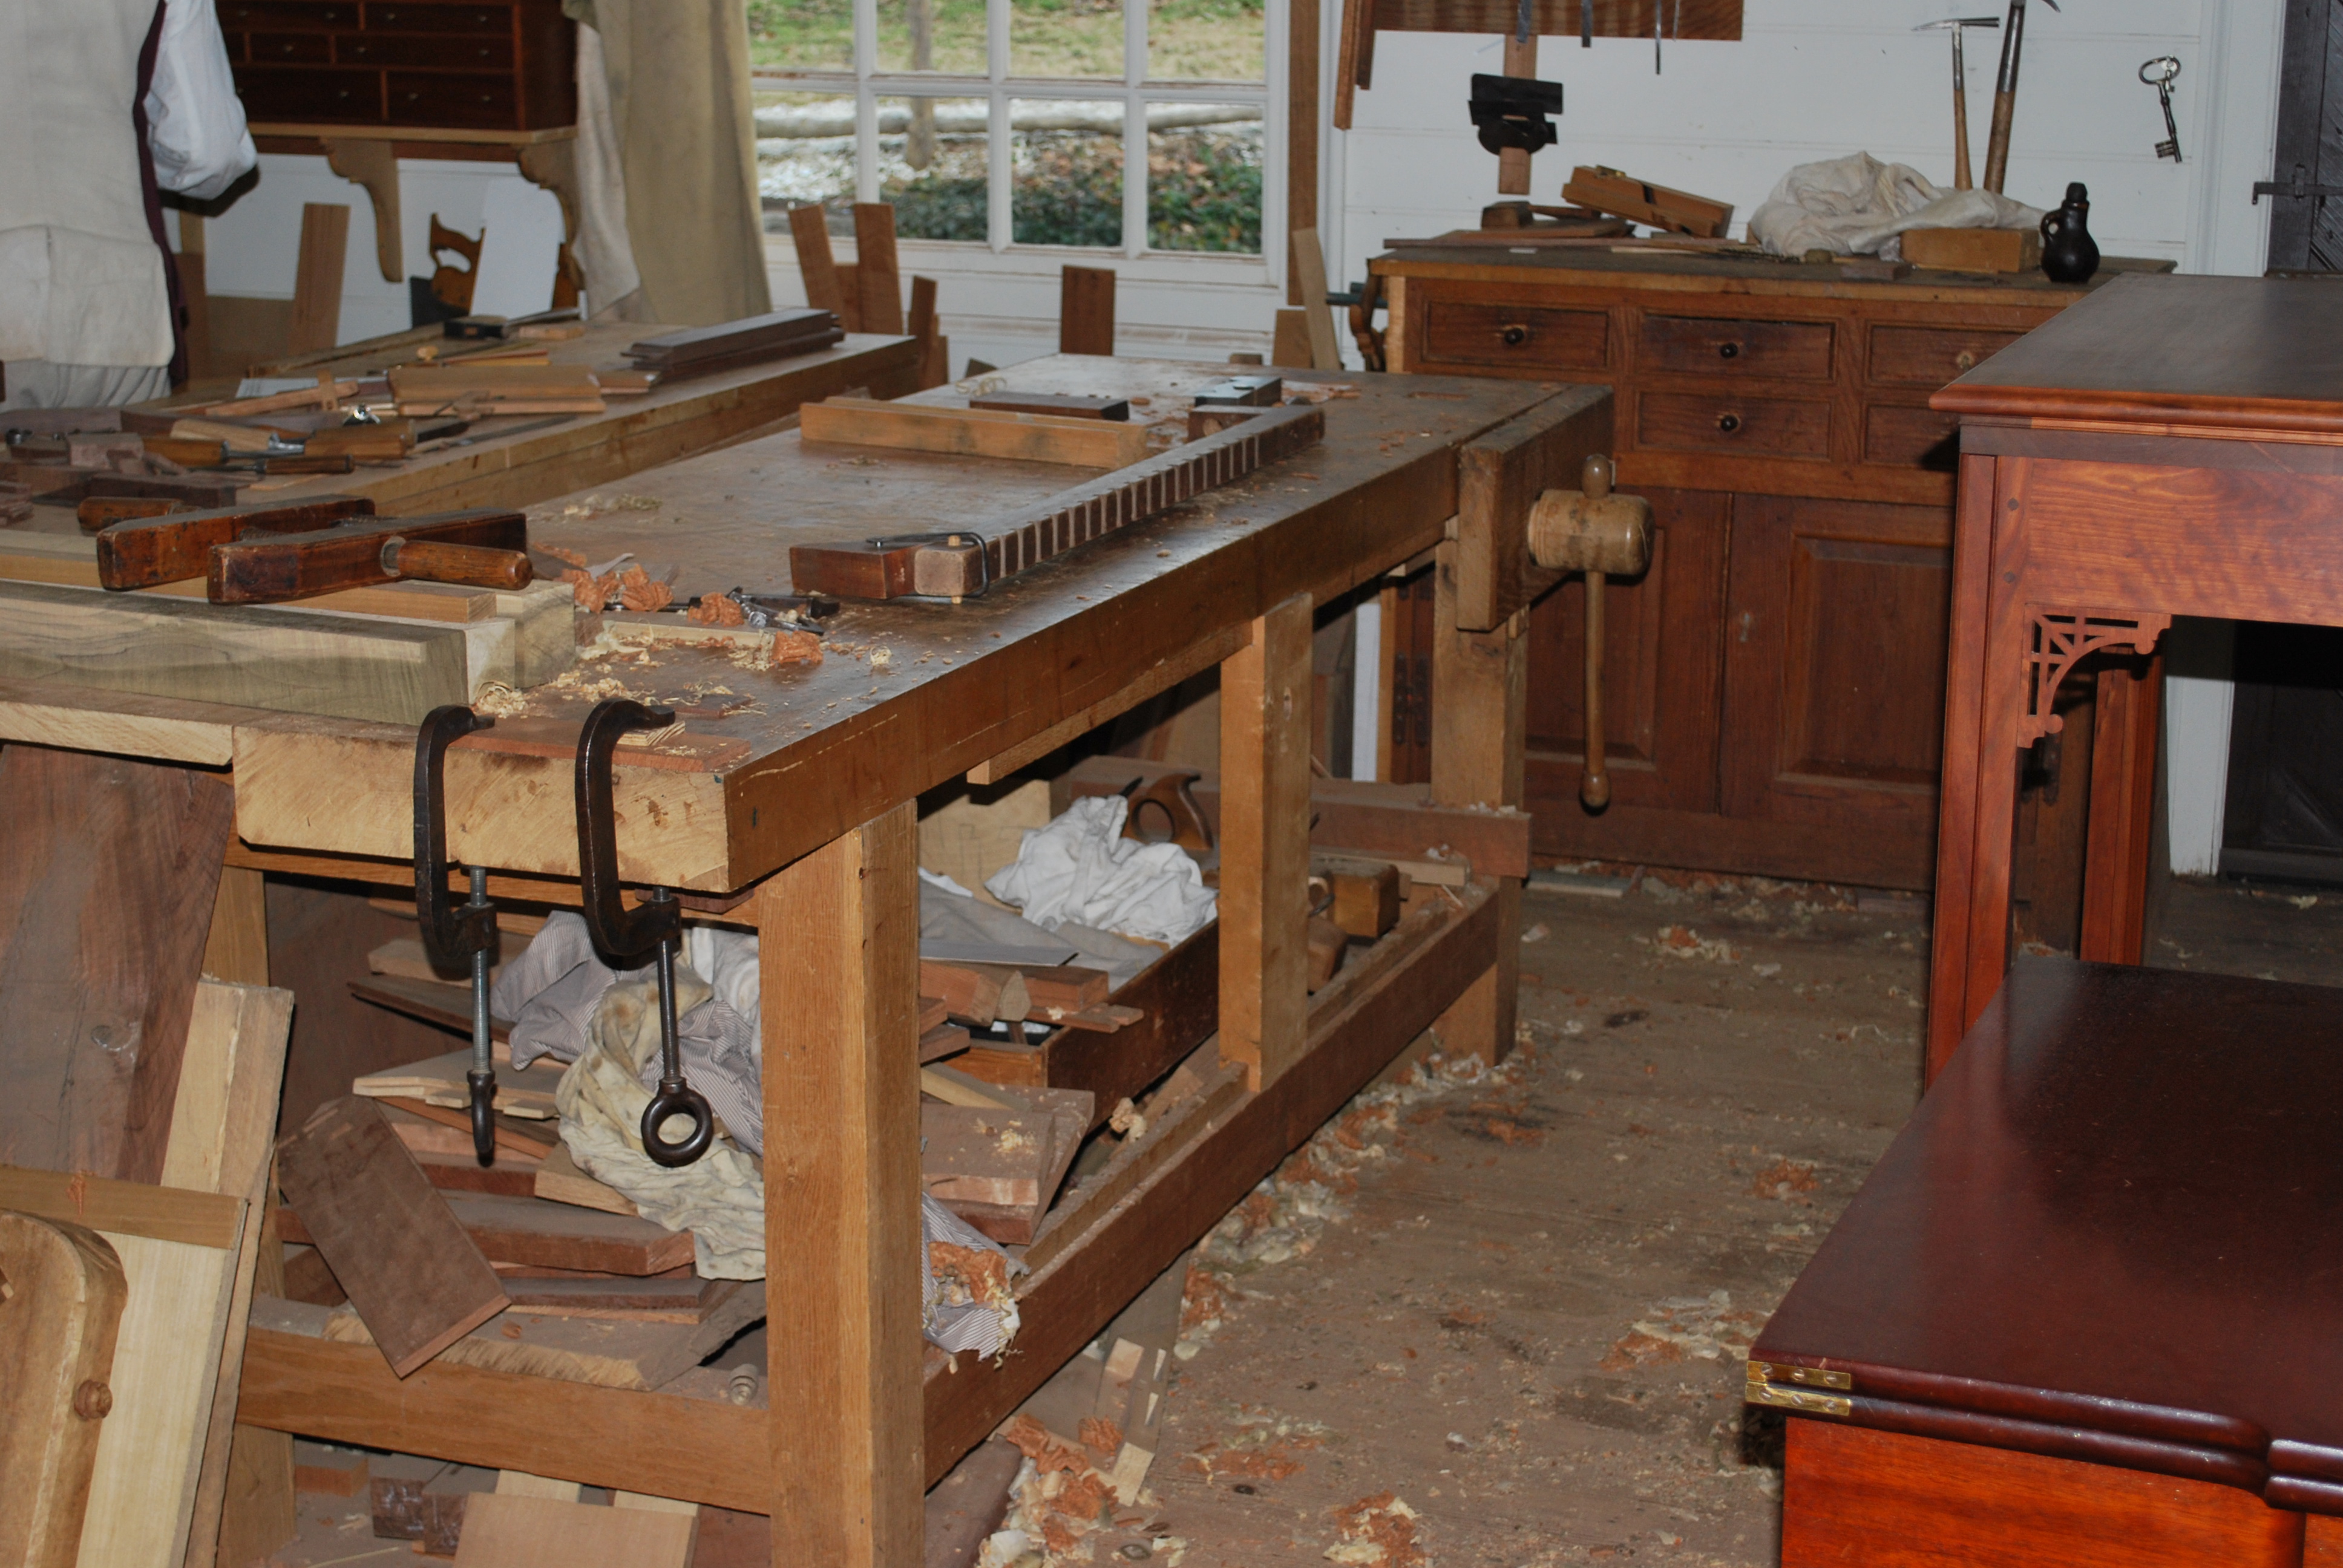
So here’s what’s going on with the right end vise (really not a tail vise, now is it?). Just about complete and being dry fit to to the to the top;

You can see the “sacrificial chop” squeezed between the front chop and the bench top. It will be trimmed to height when everything is finally assembled.
The next step is to set up the tool tray. This will require a “plough” that will accept the “floor” of the tool tray. I could do this with a router. But I’m still trying to loose that ten pounds that I put on during the holidays. (I still don’t know how it happened.) So, I gonna make this plough with a Stanley 45. This is a plane that you can definitely develop a love/hate relationship with.

The one bit of advice that I can give you about using any plough (plow) plane is, to start “at the end”. Work your way back from the terminus. Trust me, it’s better that way. Plough’s are remarkably rewarding in their simplicity and efficacy. Just enjoy them and don’t worry about the time that it will take you to make that plough. Remember, for hand woodworkers it’s about the process. Right? I mean, come on, it is all about the process, right?

I’ll explain that loose tenon hanging out of the end of the bench next time. But for right now, let’s just let it be a mystery.
Wooden screws can become a vise
September 29, 2011I’m getting closer to the completion of the portable Roubo (Underhill) bench. I decided that it should have a tail vise. I wanted to do something a little different. There are a lot of ways to create a tail (end) vise. You can go traditional European, or use something like a “wagon” vise or some other type of “running block and pawl” apparatus. I decided to build a vise that would use one of the many 2 1/2″ wooden screws laying in different corners of the shop and could use the entire width of the bench (except the tool tray) as an inner chop. What I’ve constructed is, essentially, a wooden version of the iron woodworking vise familiar to us all, like those made for years by Jorgenson, Record and so on. The screw is in the middle and two stabilizing “rods” slide through two “saddles” to eliminate excessive lateral movement. The nut is simply left loose. The outer chop is 2″x7″x13″. It’s thick enough that I can drill it out for a round dog or inlet a square sliding dog into the front surface. Time will tell about that. Ultimately, I’ll cut the rods to length and mount a simple stop device, so the screw can’t be inadvertently loosened from the nut. The whole affair will then be lag screwed to the bottom of the bench.

top view (dry fit)

bottom view (dry fit)
The front vise is a simple, heavy-duty, leg vise with a “cheese-board”. However, I intend to have a secondary front vise that will allow me to hold large carcass parts for operations like dovetailing, ripping, etc. This will be a single screw/single rod type vise. I’ll be using one of my Lake Erie Toolworks nuts for this job. A great example of this type of vise can be seen in use at the Anthony Hay Cabinet shop at Williamsburg. (Also, check out their excellent blog, anthonyhaycabinetmaker.wordpress.com)
Here’s a variant on the design from the “Manual of Traditional Wood Carving” by Paul N. Hasluck:

- back viewFront viewfront viewfront view


And, “The Workbench Book” by Scott Landis has an extraordinarily good chapter on shop-built vises. It’s well worth perusing. There’s a lot of books out there about building workbenchs. But, in my opinion, Landis’ book is clearly in a league of it’s own.
NUTS! What one can learn from failure
August 21, 2011I’m very happy to be in possession of a couple of nuts from Lake Erie Tool Company. They’re beautifully made.

- Nuts from Lake Erie Tool Company

As I mentioned to you in a previous post, I highly recommend that you buy your wooden bench screws and nuts from a vendor who is set up to manufacture them on a production basis. Okay, the screws are easy enough. Make them if you want to, but I’m still suggesting that you buy the nuts and save yourself a whole lot of headaches.
Never being one to take my own good advice, I just had to try to come up with a way I could produce a higher quality nut for my own use with stuff I already had in the shop. I had produced several screws that were undersized and I didn’t want to waste them. So why not waste three or four days of my time instead?
DON’T TRY WHAT I”M ABOUT TO SHOW YOU AT HOME – IT’S DANGEROUS AND NOT WORTH THE TIME YOU’RE GOING TO WASTE!!!
I decided I could use my lathe as a spindle to hold a fly cutter. I ground down an old spade bit and made a fly cutter with two 60 degree cutting edges.

Then I figured that I could use my “lunette box” from the screw making machine. I could use the same lead screw. All I had to do was make a hub with a couple of stand-offs to support the nut blank.

Then I’d use a center plug and mount the blank and simply slowly turn the blank into the flycutter and voila, a perfectly formed nut.

Okay, pull the plug, turn on the cutter, turn the leadscrew….

Then it all went awry. Cumulative clearances, an over-extended leadscrew, a “too thin” cutter all came together to form the perfect storm. Overwhelming vibration set in. And, try as I might, I simply was not man enough to restrain the whole thing. I did succeed in creating several nuts, all of which were over diameter and not nearly concentric.
Though I lost a couple nice pieces of hard maple, I was reminded of a valuable lesson: failure can be a much better teacher than success, assuming that you can kick your ego out of the room while the class is being held.
So, once again I say unto you, make a screw, buy your nuts.
I think I’m gonna try to repair my old wooden tapscrew. What the heck?????
Making Wooden Screws – Lessons Learned
August 5, 2011Well, just a few minutes ago my big wood tap screw went KABLOOIE!! It was made out of cherry, so I didn’t expect it to have an extremely long life. I’ll have to make another one, maybe.
If you’ve been reading the blog over the past few weeks you know that I became completely enchanted by the big wood screw making process. Now I can share with you the wisdom I have acquired as a result of this process.

- Three wooden bench screws in ash (it’s tough and it’s what I had on hand)

If you’re willing to put in the time (and a little money), making the screws is pretty simple stuff. The nuts, on the other hand, are difficult to make, at best. They’re not that challenging in a technical sense. It’s just extraordinarily laborious work. Using the type of traditional tapping machine that Underhill shows (shown in previous articles in this blog), the nutmaking process requires hours of manufacturing time and a significant amount of elbow grease. Fitting is required and though serviceable, the internal threads show an appreciable amount of damage, created when the scraping cutter traverses the “against the grain” quadrant of the “face grain” presented block.

The nuts are the HARD part!
The long and short of it is this: I’m glad I did it. And since I’ve built the fixturing, I may well make more screws in the future, a few for working, a few as gag gifts. But my STRONG suggestion is this – BUY THEM. Wooden bench screws are great for any bench application. For hundreds of years they were the standard. They’re still great! But do yourself a favor, buy your bench screws from a reputable supplier; someone like Lake Erie Tool Works . If you want to make your own screw, so be it. But save yourself a lot of headaches and buy the nuts. You’ll be glad you did.
A Simple Machine to make large diameter wooden screws – cont’d
July 10, 2011So here’s a pic of the lunettes in place:

The “lead” (or master screw) and the workpiece are connected with a socket and stub joint that is locked with a screw. The stub should be the same diameter as the socket, close to the shoulder, but should be a little tapered away from the shoulder. This will allow for some very probable misalignment. Remember, we’re dealing with wood here and my shop is 90 degrees with a fair amount of humidity.

Set the router to depth (several passes are probably, but experiment), turn ‘er on and start twisting the lead screw.

Forty odd hours later, $50 lighter in your wallet, here’s what you end up with:

Wooden screws, these will be seated into hubs - but blanks with integrated hubs will work just the same
Have fun. You’ll need to experiment a little. But I think you’ll find that it’s very worthwhile.
A Simple Machine for making large (2 1/2″) diameter wooden screws
July 10, 2011Alright! I should have been cleaning up this hell hole that I call a shop. I should’a just bought the damned things. But wait a minute…

walnut "machine screw"
After forty hours or so of scratching my head and puttering around in the shop, I’ve managed to build two simple machines that will allow me to manufacture all of the big wood screws I want, in short order. So if I figure my time at $35/hour, I’ll be in the black after I’ve made a dozen or so. So, guess what everyone’s getting for Christmas this year.
Well okay. If you only need a couple of big wooden screws, buy ’em. However, it seems that a number of wooden screw manufacturers have come and gone in recent times. So, it might be a valuable skill to have in your “toolkit”.
Here’s what did:
First, I laid out my spiral on the cylinder that would ultimately become the “lead screw”. Then I sawed down to the root depth.

Note the "depth stop" held in place with a couple of small clamps
Then I built a “box beam” and eight (or so) “stantions” that will be used during the screw making process.

some stantions are held fast, others are loose so they can moved during the process
Followers of this blog will immediately note that there is a router involved. I’m sorry!! But the machine is built in such a way that a manual cutter could be used. But, you know, I’m getting older, I don’t know how much time I have left, I’m not as strong as I used to be…. So live with it!! I used a router!!

router simply secured to the stantions by a couple of drywall screws
Then I used one of the stantions to mount two “lunettes”. The lunettes are actually made from a .025″ x 12″ feeler gauge. See Roy Underhill’s book, “The Woodwrights Workbook” for an excellent explanation of how this will work and remember that the lunettes must be offset by half of the pitch (you’ll figure it out immediately). The “ramps” are set at an average angle of the pitch taken from the minor and major diameters.
Well, I’ll finish this up tomorrow. It’s been a full day and, alas, it’s time to retire.
Making Wooden Screws – The Saga Continues
July 1, 2011There’s a pretty good chance that if I would have charged myself $10/hour for my time, I could have paid for the two screws from Lake Erie Toolworks by now (maybe more). But I’m havin’ fun and I do consider myself a bit of a woodworking historian. So…I’m living history.

- nut blank in place – tapping in progress

The nut being made above will replace the right hand support, thereby eliminating the temporary “lunette”.

right support replaced with permanent model
Alignment is critical. At 2 2/2″ diameter, there is no “give”. Lesson learned this morning; If threads are not filed absolutely evenly, they can be overstressed if there is the slightest misalignment. The good news is, the screw works well even though two threads have chunks missing equal to about 1/5th of their circumference.
This screw is made from cherry. It was what I had on hand, but it may not have been a great choice. Something “tougher” like elm, hickory, apple or even sycamore (with it’s interlocking grain) are probably better choices. When the threading “machine” is complete, I’ll try a few other species. Stay tuned…
Making Wooden Screws
July 1, 2011Well, I decided that the Little Underhill Bench needed to outfitted with two, not just one, but two wooden screw vises. I thought about buying a couple of screws and nuts from Lake Erie Toolworks. That would have cost me $300, give or take a little. But then I thought, how hard can it be? Plus I’m a guy who loves the process and the history of woodworking, I’m “semi” retired, so why not make them myself? That’s how it started…
I went to my bookcase, pulled out the “Woodwright’s Workbook”, in which Mr. Underhill discusses making your own screws at considerable length. Then I pulled out “Woodturning Techniques”, by Mike Darlow. His presentation is even more in depth than Roy’s. Hey, these guys are heavy hitters and between the two I found all of the information I needed to get started.
I decided to make a number of 2 1/2″ diameter, 1/2″ pitch screws. The first task was to layout and hand carve the master screw which is used in building the “Big Tap”. I have found out that tapping the nuts is the more difficult of the two tasks (threading the screw, tapping the nuts) and I decided to make a tapping “machine” as shown in the Underhill text (one from the Williamsburg Collection).

Master screw on the lathe, just carved and cleaned up with a triangular file
The major diameter of the screw is 2 1/2″. The minor diameter is 1 5/8″. Note that I’ve stripped the threads from about the first 8″ of the screw. That section will be inserted through the nut bland, then into the left support. Also a 60 degree V cutter will be inserted (held in place by an insert and set screw) about 4″ from the left end.

Filed and sanded to create slightly truncated threads which will be more durable.
The major diameter of the screw is 2 1/2″. The minor or “root” diameter is 1 5/8″. Note that the threads have been removed from the left section of the screw, approximately 8″ from the end. This portion will be inserted through the nut blank, then positioned into the left support to maintain position during the tapping process.
The parallel surfaces of the right support will be cut and angled at about 5 degrees, the pitch angle of the screw. My original plan was to use two “lunettes”. However, I opted for a single 1/4″ brass bar to use as a temporary nut. The left hand support is temporary and will be replace with the first “nut” made on the “machine”.

Right support showing temporary "lunette" and angled surface to match pitch. Note the abundance of paste wax. Trust me, use a lot of wax or oil
Think I’ll make another “simple machine” for threading the screws. Carving them is great therapy,
but one of these days I’ve gotta get this bench done and on to other projects.
I’ll keep you informed…
