White paper – raw lumber

Posted March 28, 2021 by D.B. Laney
Categories: Uncategorized

Fifty-two years ago, I was released from active military service. I was glad. Almost immediately, I entered college on the GI Bill. I was glad. I majored in history, minored in philosophy. I loved it. I was glad. A liberal arts curriculum requires a student to write, a lot. I was glad… That said, many times, I was stumped. I remember sitting for long stretches, simply staring at that sheet of paper. I suffered from the dreaded “white paper syndrome.”

I am “smack, dab, in the middle” of my eighth decade. What does that have to do with anything? Well, I’ll tell you that now I suffer from “raw lumber syndrome”, which apparently attacks the same parts of the brain as does its “white paper” cousin. It’s not that I’m out of ideas of things to build. I have too many ideas. There are so many (potential) projects, so little time. What to do first? Not to mention second, then third.

Couple the confusion of too much input with things like being unable to lift and tote a 4 x 8 sheet of plywood and you have a recipe for frustration. Just today I found myself standing at my work bench, asking myself why I was holding a “45” in my hand?

It should be remembered, that Einstein developed the Theory of Relativity as a “thought experiment”. I find that many of my projects are now completely constructed in my head, long before they ever reach the workbench. This phenomena affords many benefits. Imaginary projects have no cost of materials. They require no additional space for display. And, they do not engender haggling over price with wannabe buyers. Imaginary projects are, perhaps, the perfect thing for the woodworker who has entered the “season of mastery.”

I’m sure that, as the weather warms, the completion of a number of on-going projects will increase in importance. But, for now, I will simply be content to paraphrase a well known philosophical consideration;

I THINK (about woodworking)

THEREFORE, I AM (woodworking)

The Arrogance of Experience

Posted February 27, 2021 by D.B. Laney
Categories: Uncategorized

Tags: ,

    There is no substitute for experience.  Your skills become more practiced.  Your knowledge base broadens (and, hopefully, deepens).  You develop shortcuts that help you expedite the completion of routine tasks.  You learn that there are certain rules that can be “bent” without injuring the outcome of a project.  And, this is where the arrogance comes in.  If you bend the rules enough times, without injury or negative effect, you begin to forget their importance.  This phenomenon can be very bad indeed, as when not using a push stick while ripping stock on a table saw.  “Serial rule breaking” can call into question the abilities and wisdom of even the most seasoned craftsman. 

    All competent woodworkers know that they must plan for wood movement.  This is a rule, a really BIG RULE!  Good designs accommodate the material’s natural tendency to move with changes in humidity.  Of course, the first rule is to work with material that is at equilibrium.  That is to say that the moisture content of the material remains relatively constant.  (Best test for determining equilibrium is to weigh a sample over the course of a week or so to determine changes in moisture content.  Several days without significant decrease in weight indicate a state of equilibrium.)  In this part of the world, 9% is considered to be indicative of material at equilibrium.  Experience tells us that most domestic species can be worked in the shop without fear of significant movement of deformation at moisture levels between 8-10%.

    Construction grade material is typically worked at much higher moisture content.  Many of us have had the experience of hitting a piece of framing stock with a hammer and then witnessing the resultant “dimple” fill with water, as if “by magic”.  The probability here is that this is material at 20% (or higher) moisture content.  Probably okay for framing a garage, not so good for “bench work”.  So here is my story…

    I’ve been “re-doing the shop” (for about the tenth time in seventy-five years).  I built a large layout table to replace several work benches that now reside in my friend, Chad Stanton’s shop.  I used southern yellow pine for the table top.  It’s a great material for this type of use, tough and inexpensive.  As it’s winter, I concluded that several days of acclimation in the shop would be adequate.  Indeed, Chad and I put a 32″ x 120″ top together with just the slightest hint of a cup.  And, that was overcome with substantial lag bolts, sliding on fender washers.  Voila!  Layout table in place and working as planned.  Sixty-plus years of experience pays off again!

    So, I decide to build several little storage boxes for things like Stanley 45’s, et cetera.  I’ve got some cut-off stock from the table top.  Might as well use it.  It doesn’t have to be anything fancy.  After all, these are just going to be little sliding top boxes.  They’re just for keeping stuff out of the dust.  I split a couple of pieces of 2×12, plane them to about 5/8″ and proceed to build a little dovetailed, five sided box.  I glue it up and slip the top into place.  Turn off the heat in the shop.  Take the box into the kitchen to allow the glue to dry overnight….

    It should come as no great surprise, when in the morning it required a substantial amount of effort to remove the top from the box.  I had BENT THE RULES!  The arrogance of my experience had taken over my thought process.  I disregarded the rule of equilibrium, to my shame!  Mea culpa…

By the way, Semper Optimum translates to “Always your best”.  I stand humbled.  Mea maxima culpa.  There are reasons for rules (even for old guys).  It’s good to be reminded every now and again…                  (And, always use a push stick!)

Annual Report

Posted April 15, 2019 by D.B. Laney
Categories: Uncategorized

Tags: , ,

Well…  It’s a year since my last post.  Quite a lot has happened.

In October of 2018, my good friend and workmate, Les Elsie passed away.  He will be missed by his “brothers”.  For the past few years Les and I worked together at least one day a week, trying to get several of his unfinished projects completed.  We were often joined by our friends, Chad Stanton and Scott Midgeley.  The last project was nearly completed at the time of Les’ death.  Sadly, I don’t know if it will ever be finished.

QA Highboy

After moving more than a year ago, my shop is finally beginning to take shape.  Insulation, heat and, yet, another work bench have made life a little more comfortable and productive.

Trimming the place out a bit has allowed for a little practice carving.  (I take any chance I can to practice.)

tool cabinet

My wife suggested that I get to work on a TV table for the guest bedroom.  The style I chose doesn’t accommodate the digital hardware very well.  But it will just have to do.

I don’t think this will be my last post.  It’s hard for me to keep my mouth shut and my fingers still.

Asphaltum – You gotta get some

Posted March 8, 2018 by D.B. Laney
Categories: Uncategorized

Over the last few years, I’ve noticed that there has been renewed interest in (and something of a mystery about) the use of asphaltum in wood finishing.  It comes as no surprise that once one of the most widely used products for protecting and finishing wood, is now almost unknown to the majority of modern wood workers.  Or, is it?

The product has many names; asphaltum, asphalt, bitumen, pitch, tar.  It may be liquid (think LaBrea tar pits) or solid (Gilsonite, a high quality mineral asphalt or simple coal).  Over the millenia it’s been used as an adhesive, a waterproofing material, a decorative finish, a paving binder and a medicinal.  Tar can be extracted from pine, birch and numerous other trees.  At one point, the harvesting of pine pitch was one of the largest industries in North Carolina.  Pitch, tar, turpentine and rosin (colophony) were all materials made in the distillation process.

During the period of sailing ships, tar had many uses.  It was used as a protectant  for rope, sail cloth and straw hats, to name a few.  Nelson Checker, the famous color scheme of the British Navy, was influenced by the fact that hulls were painted with asphaltic paints.  Mast heads and spar tips were varnished with a black asphaltic long oil (spar) varnish.

“Black Japanning” was a commonly used method of protecting metals right up to the beginning of WWII.  Black Japanning is simply a formulation of three main ingredients; asphalt, boiled linseed oil and turpentine.  Ford Motor Company used several formulations of Black Japanning.  The first a “long oil” varnish (less asphalt, more oil, turpentine) was used as a primer and on parts that required a more “elastic” finish.  The second, a “short oil” varnish, as a final finish on parts experiencing less flexure.  Occasionally, lamp black or very finely ground coal dust might be used as an additional pigment.  Distillation quality of the turpentine (the volatile oil) or the addition of a metallic drier (probably) allowed some control of drying time.  Of course, anyone with an interest in metallic hand planes knows that all of the major tool producers used Black Japanning to coat the “non contact” iron surfaces of their planes.

So, what does this have to do with today’s woodworker?  Well, first things first.  Next time you’re at your favorite finishing store, notice how many brown wood stains list asphaltum as an ingredient.  The picture above is a good indicator of how many shades of brown can be created by a simple dilution of the product.  In varying formulas (tar, BLO, turpentine), asphaltum can be used as a rubbing stain, a glaze, an oil varnish (tar, BLO, turpentine) or spirit varnish (no BLO, turpentine or naptha).  I, for one, am always looking for ways to reduce the number of finishing products in the shop.  I want products that allow me to create the finishes I want and have good shelf life.  Plus the fewer cans and bottles I have laying around, the fewer I have to get rid of (a task that becomes more challenging as municipal waste rules evolve).

There are numerous sources for asphaltum products.  My major concerns are quality and a fair price.  Art stores offer Asphaltum Etching Varnish, Gilder’s Asphaltum, Asphaltum Artist Color, and Asphaltum Glazes.  That said, for what I’d pay for two pints of Gilder’s Asphaltum I can buy a five gallon can of Henry 101 Non-fibered Foundation Coating (Asphalt and Mineral Spirits).  (A caveat:  stay away from construction products that are rubberized or fibered.)  You might, rightfully, ask “what am I going to do with five gallons of asphalt?”  One suggestion I would offer is to give all of your woodworking friends “a bottle for Christmas.”


When you lose the muse

Posted February 7, 2018 by D.B. Laney
Categories: Uncategorized

Looking back over 2017’s activity, I see that I posted only four times.  Four posts!  Not too long ago I’d post four times a week.  So what’s happened?  After nearly sixty years of woodworking have I had enough?  Has “the muse” deserted me?  Perhaps.  But I doubt it.

The last twelve months have included a fair amount of travel and a move.  Yes, a move.  Gone are the days of being confined in my “little shed”, tripping over lumber, blowing fuses, etc.  The new abode includes a 2 1/2 car garage that will become the shop.  Of course there’s a fair amount of preparatory work to be done; insulating, heating, painting (white, white, white).  Then there’ll be new tills and racks to build, getting the lighting just right, sorting through boxes.  All that has to be complete before I can start back to work on a number of projects that remain unfinished.

While attempting to relocate the muse, I have made a few notes to myself:

1.  Running out of room for furniture – Hmm – What to do?

2.  Explore some areas of the craft that you’ve been away from for a while.

3.  Share as much information about “trade” geometry as possible.

Wherever the road takes me…

Still Learning (after all these years)

Posted October 6, 2017 by D.B. Laney
Categories: Uncategorized

Tags: ,

Eight or nine years ago I bought a new lathe.  The first thing I did was to make several sets of legs and arm stumps for a pair of Windsor Chairs.  I put them into a five gallon pail for safe keeping.  There they remained, till now.

The first of the pair is nearly complete.  Wow!  Have I learned a lot.  I’ve built a number of chairs, but this is the first sack-back I’ve done.  I have new found respect for my friends who specialize in this particular design.

Here are a few of the lessons learned:

–  You can’t overstate the importance of a good form,

–  Tangential relationships are critical,

–  Use bending straps,

–  Use green wood for bending,

–  Have plenty of bending stock on hand,

A project like this is exactly what keeps me interested in woodworking.  No matter how much you know, there’s always something new to learn.  (Or in the case of many of us, it may be that we’ve forgotten more than we care to admit.  So, shall we say, there’s always something new to remember.)


Resurrection

Posted July 21, 2017 by D.B. Laney
Categories: Uncategorized

Tags: , ,

I met an old friend on the street the other day, a friend I hadn’t seen for a year or so.  He walked up to me, smiled broadly and said, “Good Lord, I was sure you had died.  You haven’t posted anything since February!”…  What an “eye opener!”

Truth be told, the past few months have been full of travel, visits from family and, honestly, I just haven’t had anything to say that I thought was worth saying.  That’s not to say that there hasn’t been anything going on in the workshop.  Although I have to admit that my level of productivity has been seriously diminished. But, maybe now is a good time to “get back in the game.”

Lester (my partner in the crime of woodworking) and I have managed to finish a couple of projects during this “black-out period.”   We completed a small tavern table (based on one in the Metropolitan Museum of Art) that Les had started a number of years ago.  While dry fit, it served to provide a small amount of temporary storage for a number of years.    He opted for a oval top made from a single piece of curly maple that he’s had in storage since the last Dempsey fight.  He decided that heavy distressing was just the ticket.  So, Les, our friend Scott Midegeley and I attacked the thing with lanyards full of keys, sticks, rods, stones.  It was scorched earth!

After the beating, the top was dyed with amber water based dye, then glazed with “black oil”, a combination of asphaltum, turpentine and BLO.  The top was then finished with several coats of Waterlox.  The cherry base was stained, coated with Waterlox then painted with a satin black alkyd enamel.  Then the paint was “wet wiped” to create a heavily distressed look in the areas that would have been subjected to the most wear.  Imagine the Founding Fathers sitting around one of these little beauties, drinking warm ale and trying to determine the best way to run a Republic.

The turned legs were terminated with simple Spanish feet of the “fluted” variety.  Ends of the “ogeed” aprons were finished up with a decorative cockbead.

I became so enthused that I ran right home and started my own Tavern Table.  There are a few differences, but the design is essentially the same.  The carriage is of walnut, the top is elliptical, the finish is the same with less distressing and I opted for a little longer, more feminine Spanish Feet (probably a subliminal influence of having just watched a Penelope Cruz movie).  The aprons are relieved to create a lighter look and the top has a simple torus edge and I nixed the cockbead (for no good reason other than the fact that I wanted to get the thing finished).

Here’s a look at the table through part of the construction process:

And, if you don’t believe in the possibility of resurrection, just stand near the parking lot gate at “quitting time.”    “Gramps”


Andy gets his own chair and “iddy-biddy” parts

Posted February 27, 2017 by D.B. Laney
Categories: Uncategorized

Woodworking has been subordinated by the work of giving the home interior a new look.  But we still manage to scratch out a little time for “making chips.”

Les completed another high chair for Raggedy Ann’s soulmate, Andy.  Cherry was used and Les opted to give the chair a little “sun tanning.”  The result was rewarding.  The chair darkened to a deep reddish color, then was finished with three coats of Waterlox Original, prior to the seat weaving.

007

We continue to plug away on the jewelry box project, changing designs “on the fly.”  We’re at the point of making small interior partitions.  I’ve concluded that sawing up bunches of small parts is not my favorite part of woodworking.  But the final product should displace the anxiety.

029

Winter work

Posted January 28, 2017 by D.B. Laney
Categories: Uncategorized

Working in my shop in winter is akin (I imagine) to being sent to the Gulag.  Suffice it to say that it’s difficult to be at the top of your game while wearing a toboggan cap, gloves, a sweater and a mackinaw.   So the bulk of the winter months provides me with time to work on designs, play the banjo and catch up on reading.

However, Les and I get together at least once a week to indulge our creative “demons”.  The projects tend to become somewhat smaller during the “first quarter” of the year.  This year’s effort is centered around getting rid of scraps.  My guess would be that just about all woodworkers share a certain reluctance to get rid of “shorts and drops.”  A number of justifications for this “failure to eject” seem to be universal: “These can be used as glue blocks”;  “The minute I through that away, I’ll need another”; or the “classic”, “I’ll never be able to find another piece like that”.  (If anyone needs glue block material, let me know.)

This year Les came up with a plan to rid his shop of “fancy and exotic” scrap.  His plan?  Jewelry boxes.   So we’ve been doing our best emulate several of the older elves at the North Pole.  The process is proving to be rewarding.

055

052

053

056

There are few things better than the feeling of freeing yourself from the aggravation of “surplus, potentially unusable inventory.”  However, this project poses a conundrum in it’s own right; what will become of all the finished boxes?

Not forgotten – just finally complete

Posted December 9, 2016 by D.B. Laney
Categories: Uncategorized

Tags: , ,

Those of you who have followed this blog for any length of time know that Les and I tend to work slowly. And, it’s not unusual for us to put aside an unfinished project due to being distracted by some new “bright shiny object.”  (One might argue that this is evidence of old men being similar, in many ways, to children.)

We started our Asian inspired hall tables quite some time ago.  We’ve both gotten tired of tripping over, navigating around and moving them out of the way.  So we completed them.

Les’ table is all blood wood.  Mine has a blood wood top and an ebonized walnut base.  Our first plan was to finish them in sprayed lacquer but the weather just never proved to be cooperative.  We opted to use a variety of finishes but the common thread was the use of Waterlox Original finish for the tops.  Waterlox is a marvelous finish, one of the very best wiping varnishes on the market.  But a word to the wise, it is a fairly expensive product and it doesn’t have a very long shelf life.  The manufacturer recommends one year after purchase.  Normally I look the other was at shelf life dates.  But not on Waterlox!  A final word of caution:  Never, never shake it!  (It polymerizes and when you entrain air, especially if you’re closing in or past the “use by”, you’re in for a big surprise – a can of semi-solid goop that can’t be re-solubilized.)

029

208

Now that we’ve had our little adventure in the realm of contemporary furniture, I expect that we’ll get back to the “old lookin'” stuff.

“Puttering” for practice

Posted November 15, 2016 by D.B. Laney
Categories: Uncategorized

023

Everyday, after his retirement, my grandfather could be found in his workshop.  Friends from my youth will remember that in a corner of the shop was a sofa (for napping), television (for baseball), beer tap (for sustenance and refreshment) and a cigarette rolling machine.  It was the 1950’s equivalent of a “man cave.”  But much of the time, Gramps would be found at the workbench.  When asked what he was “up to”, his usual reply was “just puttering.”

Of course, what he was doing was continuing to practice skills that he knew were valuable to his craft.   He maintained this activity to within just a few days of his death.  He was fond of telling me that there was a difference between talent and skill, talent was a gift, skill needed to be exercised.

024

When I’m between projects, or it’s too warm or too cold to spend entire days in the shop, I find myself “puttering.”  I guess the apple doesn’t fall far from the tree.

Bannister back finds cozy corner

Posted November 14, 2016 by D.B. Laney
Categories: Uncategorized

copy-1-of-035

The bannister back chair is completed (for all intents and purposes).  The finish sequence was; medium walnut oil stain, two coats of one pound shellac, van dyke glaze, two more coats of shellac and a final coat of Waterlox.  The seat is woven sea grass and after a little adjusting with a fid and a sharp knife, I’ll give it a wash coat of shellac, as well.  Our home looks more and more like a museum with each passing day.

Bannister back chair – simple jig saves the day

Posted October 30, 2016 by D.B. Laney
Categories: Uncategorized

In an earlier post, I mentioned that I had decided to “sight” bore the stretcher mortises on the chair.  Big mistake!  I’m loathe to build fixturing for a “one off” project.  Call me short sighted.  Call me cheap.  But sometimes, you’ve just got to do it.  So after realizing that my original boring method yielded a far less than perfect result, I vowed to plug and re-bore with the assistance of some sort of drilling guide.  I opted for something very simple, knowing that, in all likelihood, it would end up in the kindling box when I was finished.

jig

Three blocks of scrap, same section dimensions as the posts, “rubbed” together,  inscribed with the correct drilling angles for the side stretchers.  A fourth block, beveled at the seat pitch angle is inserted and provides the correct angle for the seat rails.  As simple as that.  Down, dirty, quick and easy!  Why didn’t I do this from the start?  Answer:  Being 70 only means you’re older, not necessarily smarter.  Plus you forget techniques, rules, etc., if you haven’t used them in the past two weeks or so!

The result was rewarding.  Assembly required only a few gentle taps and, voila, the chair sits perfectly!

030

The arms are roughed in.  Now begins the “clean-up”, fettling the details.  With any luck, we’ll set Santa’s milk and cookies along side the chair.

BTW, here’s a thought you may want to share with  family, friends and neighbors who are unable to put down their communications devices whilst driving:

“Honk if you love Jesus.  Text if you want to meet him.”

Bannister back chair – Oh! So many angles!

Posted October 17, 2016 by D.B. Laney
Categories: Uncategorized

008

Well, it’s coming together and looking something like a chair.  But I have a little confession to make.  I thought I’d save a little time by simply “sight” boring the posts for the side stretchers.  Seemed simple enough.  The seat plan is trapezoidal, only two angles, “should be able to do this in my sleep.”

But then I decided to drop the back of the seat by an inch, to make the “slouch angle” a little more comfortable.  KABOOM!  I created a resultant angle situation, like “when does a triangle contain more or less than 180 degrees?  When you introduce a second plane into the situation, kind of like “bending space”.  You know, time travel, that kind of stuff.  To complicate matters even further, I was using mirrors.  One mirror in one plane works like a champ!  But add a second mirror, which can create a resultant angle if not placed correctly,  add an actual resultant angle and you’ve got way too many moving parts.

The moral is, either throw together a jig or invite a couple of friends over to sight for you.  However, offer them nothing to drink till the boring’s complete.  I’m going to have to dig deep into my bag of “tricky corrective measures” on this one.  Remember the old adage, “the difference between a pro and an amateur is that you can’t find the pro’s mistakes.”

Carving the Spanish Foot with simple bench tools – a pictorial

Posted October 13, 2016 by D.B. Laney
Categories: Uncategorized

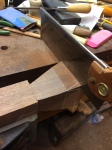
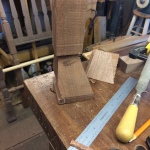
As I mentioned in an earlier post, the Spanish Foot (vernacular) must surely have been a godsend to furniture makers.  Its manufacture requires very few specialized tools.  The only carving tools I’m using are a “90 degree V tool” and an 8 sweep 16mm gouge.  (You can forgo the fluting and get by with a sharp bench chisel and knife.)  Even rural craftsmen could present something to clients that mimicked the styles popular at court.

Bill Brown suggested that a brief tutorial on carving the Spanish Foot with a minimum of handtools might be a good idea and, I agree.  So what follows is a simple pictorial presentation of just that.  If the pictures don’t tell the story, just ask me and I’ll “‘splain it” in English.  BTW, for those who have to “price things out”, this was an hour’s worth of work.

The Spanish Foot

Posted October 12, 2016 by D.B. Laney
Categories: Uncategorized

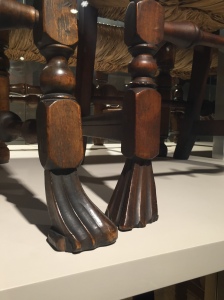
First, I’d like to thank John Kissel.  On a recent trip to the Metropolitan Museum of Art, John took a number of photos in the period furniture area that he was kind enough to share with me.  John and I briefly discussed the wide variation in “Spanish Foot” designs.  I think the shot below says it all.

img_8085

One might ask, “why is it called a Spanish foot?”  My answer is, I’m not sure.  I can only surmise that this was one of many decorative post terminations used by Continental craftsman during the Baroque period. This style was heavily influenced by Spanish Baroque artisans and approved by Holy Mother Church.  (Interestingly enough Spain also gave us the Inquisition, at about the same time.)  The Spanish foot seems to have followed aristocratic Catholics around Europe then made it’s was to England in the furniture that we now refer to as Jacobean (the Stuart period) which ended (stylistically) with William and Mary.  I’m hoping that my friend, Jack Plane will “weigh in” and provide a little more background.  Again, if you’re not visiting Jack’s blog on a regular basis, you’re cheating yourself.

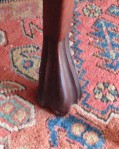
Here’s a look at a number of Spanish feet.  Basically, they all begin as right or obtuse trapezoids.  From that point, it’s all a matter of imagination.

From the craftsman’s point of view, the good news is that the Spanish foot is much easier to produce than it looks.  It requires the use of very few tools.  In fact, a simple (yet very satisfying) version can be manufactured with a handsaw, a couple of bench chisels and (perhaps) a file (or $200 rasp, if you’ve got one).

The Spanish foot is not for everyone.  It seems that you either love it or hate.  But it’s quick and unique and may have some contemporary applications.  Or maybe I just have a fetish!

Bannister back chair – front assembly – makin’ parts

Posted October 6, 2016 by D.B. Laney
Categories: Uncategorized

Tags: ,

Before starting on the actual front posts, I turned a model of the post and carved a model of the Spanish foot.  This insured that things were going to go together as planned and it allowed me to “warm up”.  At seventy, contending with some nerve damage, I need all the “warming up”, I can get.

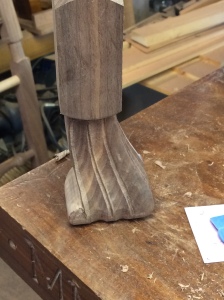
While the Spanish foot looks difficult to carve, it’s really pretty straightforward.  The basic shape is cut on a band saw, using the same layout method employed when making cabriole legs.  It requires very few tools to carve.  BTW, there is NO standard Spanish foot!  Flutes, ridges or any combination of the two have all been mixed and matched to create a wide variety of individualized designs.  That said, remember that structural integrity is critical.

004

Here’s the rough carving.  I’ll leave the tool marks in the fluted areas, but the convex surfaces will be cleaned up a bit with a fine riffler and a little light sanding.

007

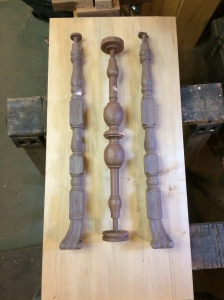
The main stretcher on any bannister back chair is always an attention getter.  These eye catching features take the notion of decoration way over the top!  You could club someone into submission with this monster!  Another point of interest worthy of note is the wide variation in color of the three pieces below.  They are all local black walnut.  The stretcher is older growth that was stored in a barn for years.  It is much finer grained and has an obvious reddish hue.  The posts are turned from younger, faster growing stock and are “bluish”, or “purply”, as some of us like to call it.  These color differences in walnut are usually determined by the mineral content of the soil in which the tree has grown.  But the atmosphere of the building in which lumber has been stored (especially long term) can also have an effect.  A piece of American White Oak may be “passed off” as English Brown after 15-20 years of storage in the loft above a working stock shed.

In any event, I’ll have to make a decision as to whether or not I try to balance of the color differences with staining or simply let the varying hues “age together”.

014

Bannister back chair – dry fit back assembly

Posted September 29, 2016 by D.B. Laney
Categories: Uncategorized

Tags: , ,

Today was fit up day.  The good news is that everything seemed to fit pretty well.  Assembly required only a little gentle tapping.  The rear seat rail is of white oak.  Reason being?  It was laying under the lathe.

011

The rear of the crest rail is straightforward.  Piercings are “heavily” beveled.  The “flower” at the top is developed on the back.  A closer look at the balusters will show a lamb’s tongue on the lower pommel.    I’d like to say that this was a critical design consideration.  But the truth is that I inadvertently bumped the pommel with the tip of a skew as I was moving the tool rest.  Lesson:  don’t move the tool rest while the stock is turning.  Lesson:  Turn an accident into a design detail….

013

Tomorrow starts the front assembly.  Whew, this fast paced production is wearing me out!

Bannister back chair – Progress – When is it enough?

Posted September 27, 2016 by D.B. Laney
Categories: Uncategorized

Tags: , ,

A question that craftsmen have asked themselves, for time eternal, is when have I done enough.   Obviously, when you’re working for a client the answer is, simple, when he or she is satisfied.  But when you’re doing something for yourself, not being driven by a profit motive, but guided by your passion for the craft, the question can be much more difficult to answer.  However, I concluded long ago that I will never reach perfection.  I try to hold myself to a fairly demanding standard.  But, I’m comfortable having that little talk with myself in which I say, “good enough.”  I’ve also learned another important lesson.  I simply mention to folks that everything looks better if you step back about ten feet.  I have no doubt that I’ll do a little more cleanup, but I’m calling the crest rail carving “good enough.”  I’ll be finishing the chair with five or six coats of “watery (1/2# cut)” shellac.  It will make the carving “pop”, really POP!

012

Right now, there’s nothing but a wash of turpentine on the carving, just to bring out the color.  It also makes those little areas that need touching up very apparent.  Umhhh…maybe I’m not quite done with it.


Bannister back chair – roughing the crest rail

Posted September 23, 2016 by D.B. Laney
Categories: Uncategorized

Tags: , , ,

I love to carve.  But, I certainly wouldn’t call myself a carver.  Most of my carving has been limited to architectural details and small work on furniture.  At first look, the baroque acanthus crest rail on this project was more than a little daunting.  But the more I studied the photos, I became aware that it was actually pretty straightforward.  The are three (maybe four) basic elevations, each designed to “pull details forward”.

The first task was to cut out the “piercings”.  I was going to do this with a coping saw, but Les offered his scroll saw.  Not too reluctantly, I accepted his offer.

Then the actual “roughing in” began.  This process allows me to come to an understanding of where the elevations are, where I need to make transitions, etc.  The good news is, that if I make a little mistake, I can always go a bit deeper when doing the finish work (thank goodness).

012

I didn’t have a photo of the back of the crest rail.  Fortunately, the construction details are to be found in the excellent tome offered by the Metropolitan Museum of Art,

BTW, This book is available for viewing, in its entirety, on the Metropolitan Museum of Art Website.  It’s an incredible resource.  It ain’t cheap, but it’s an excellent reference book for anyone building (or simply interested in) period furniture.

The top “bell flower” will be mirrored on the back side.  As in the original, the piercings will be given a broad bevel, just to give the back a little interest.  After all, not everyone can set next to the wall.

The project is going reasonably well.  For once, I might actually complete something on time.  But, you never know what might come up.

013