Bannister back chair project

Posted September 18, 2016 by D.B. Laney
Categories: Uncategorized

Tags: , ,

e6631781a61a3a9e8f70a7ab1953fe33

I’m happy to say that the Bannister Back chair project has made its way into the work schedule, finally!   It will involve a lot of turning and carving.  So it should be fun, as well as challenging.  The first step is to build the back assembly, which will become the datum for all other measurement.

The “balusters” are split turnings.  I elected to simply screw the stock together as opposed to gluing and splitting.  Using a cup live center and a multi-tooth spur allows centering right on the joint line.

058

060

Next, I prepped the rear legs for turning.  I created a roller path for the steady rest just above the point at which the leg angles.  It’s important to find the true center at the roller path.  The counter weight was attached.  These were attached with screws into the waste section of the stile.  The duct tape was an extra safety precaution.  It proved to be unnecessary, but it made me feel a little more secure.  Safe turning speed is determined by the maximum diameter.  However, minimizing vibration created by the counterweight may require a further reduction in rpm.  As I have a step pulley lathe, I was forced to turn at about 680 rpm.  This is very slow.  Patience is the order of the day.

061

063

When I want to minimize undercut at the pommel, I’ll run a line of chalk down the center of all four surfaces.   This helps me gauge when I’ve reached the maximum true round dimension.

062

064

065

After completing the balusters and posts, I turned the finials and rear stretcher.  Stock for the crest and lower rail was planed.  The bead/ogee detail on the lower rail was created using moulding planes.

004

Tasks for the upcoming week will include mortising the rails, tenoning the balusters and… carving the crest rail.  Should be an interesting few days.

068

A long summer

Posted September 17, 2016 by D.B. Laney
Categories: Uncategorized

Tags: ,

This summer has been full of visitors.  Children, grandchildren, cousins and friends.  It’s been wonderful just spending time with the people who are most important to us.  Of course, visitors means very little work gets done in the shop.

That said, Les and I have been able to get a few small projects done.  We’ve just about completed two contemporary tables, one for each household.  Les’ is constructed completely of Blood Wood.  Mine has a Blood Wood top and a Walnut base, which will be ebonized and finished in oil.  Les’ table and both tops will be finished with lacquer.


002

We’re working from a plan on this project, which is very unusual for both of us.  We’ve made very few modifications.  One notable exception was the use of a sliding dovetail to join the cross members to the aprons, rather than a through mortise, as drawn.  The dovetail is pinned from the face, both a structural and decorative consideration.

054

My next step was the ebonizing process.  As usual, I painted the base with a coat of tannic acid.  When there was no free moisture on the surface, I applied iron acetate (vinegar and iron), creating an almost instantaneous blackening.  After the iron acetate coat was dry to the touch, I applied another wash of tannic acid.  This insures complete reaction with any remaining iron.  A precipitate (iron oxide) raises and this must be removed when the surface is dry.  A buffing pad or steel wool and a little elbow grease gets the job done in fairly short order.  The following images show before and after buffing, prior to oiling.

028

029

It’s good to be back to work!

What is “craft”?

Posted August 8, 2016 by D.B. Laney
Categories: Uncategorized

If you need a lot of pictures, read no further.  If vulgarity offends you, read no further.

I’m enchanted by the internet discussions about “what is craft?”  For me it’s pretty damned simple.  As my Grandfather would say, “We have a job of work to do.  The things that we create have a purpose, a function.  That is our craft.  That is our trade.  That’s how we make our living.”

But phenomena like NAFTA and IKEA have changed the landscape dramatically.   The market for entrepreneurial craftsmen has been decimated across the nation, with the exception of several tiny areas on the right and left coasts.  Doctors and lawyers, social historians, artists and computer designers feel free to provide an explanation as to what the meaning of craft is.   There is no doubt that some of the finest woodworking practitioners today do not make their living “at the craft”.  And that’s fine, because we need people with a sense of stewardship and who are passionate about the knowledge we share.  But, please, let me give you a observation drawn from a somewhat more practical perspective.

The craft is a job, a way of supporting yourself and your loved ones.  But much, much more.  And someone sitting in an air conditioned studio or editing a digitized “re-publication” is, in my estimation, probably not the one who is best prepared to share its true meaning.

To me and “my brothers in chips” the reality of “the craft” means:

Having to beg my lumber supplier to trust me for another five hundred board feet of material;

Asking Sister “Mary Ridiculous” to keep my kids in school for just another month.  “The tuition is coming, I promise”;

Wondering if I’ll ever be paid that final draw, that ten percent that constitutes the profit on any given job;

Filing Mechanics liens;

Trying to agree on a vision with someone who has absolutely no understanding of the task at hand and does not value the investment that I’ve made in study, tools and practice;

Wondering when the next project will come;

Wondering, how in the name of God, I’ll get all this work done;

Loading the truck in the fucking rain;

Loading the truck in the fucking snow;

Loading the truck when it’s 100 degrees Fahrenheit  in the shade;

Unloading the fucking truck;

Taking time off the job to meet with the accountant about taxes;

Wondering what will happen if I get sick;

But when all is said and done, I only have to answer to two people, me and my Grandfather.  And, there’s only one question – did I do my best work.  That, to me,  is craft.  Vocation while you’re trying to stay afloat.  Avocation after you retire.  A lover that will never let you go.

Walnut COD – Done well before Christmas

Posted July 30, 2016 by D.B. Laney
Categories: Uncategorized

Tags:

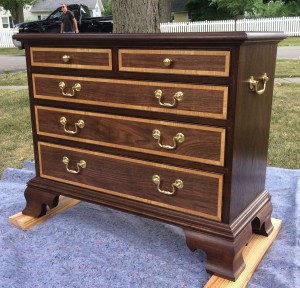
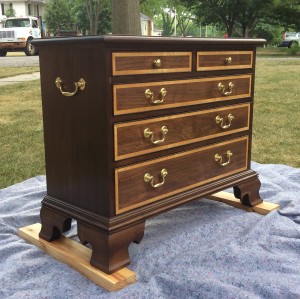
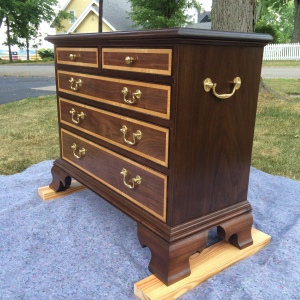
I’m not just engaging in superficial anthropomorphism when I tell you that I’ve named this project “Morphy”.  It’s been floating around here for so long that it’s become like a member of the family.  I chose “Morphy” because during it’s short life it has gone from being one thing to quite another (more than once).  But now Morphy is complete (except for shellacking the drawer interiors).

342-1

344-1

345

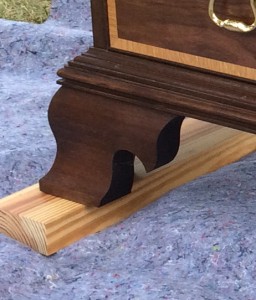
Morphy literally began as a set of feet.  I had been intrigued by feet I had seen on a Georgian Secretaire.   The sides were somewhat splayed which, I felt, made them look more “stream lined”.   The splay is most evident when sighting across the resultant angle.

343-1

(it’s the photo, not the finish – honest)

Morph’s feet are large.  They would be better suited to a wider and deeper case, perhaps 48-54″ wide and 20″ deep (secretaire, chest on chest or a substantial bureau).  Morph is more akin to a Bachelor’s chest, in stature. But remember, Morph started as a set of feet, proved to be far too deep for a bookcase then nearly became a TV stand before becoming a COD.

Morphy is more “period inspired” than period correct.  While I did all of the joinery by hand, mouldings were built up from commercial router profiles.  All of the casework parts were planed by hand as were drawer parts and backboards.  That said, when it came to surfacing the top and drawer fronts, I called on Lester to come to my rescue.  There’s just nothing like a 25″ sander, especially when you’re working up against a Christmas deadline.

I want to thank Jack Plane for his critique and suggestions as to top profiles.  As you can see, I opted for   the traditional “thumbnail and scotia”.  I’d recommend that anyone with an interest in period furniture construction become very familiar with Mr. Plane and his excellent blog.


Housed joints and wood movement

Posted July 27, 2016 by D.B. Laney
Categories: Uncategorized

Tags: , ,

My workmate, Les, and I have been working on a couple of small contemporary tables.  Usually we do our own design work, but this time we opted to use a design for a “floating top” table that has become fairly popular over the last few years.  In this design the center stretcher is, in fact, a narrow shelf.  We were both surprised that the designer/builder elected to join the shelf to the end stretchers using a “housed” mortise and through tenon type joint.  This type of arrangement, with grain direction being perpendicular between the two members, will almost certainly guarantee an “open” joint before too much time has passed.

George Ellis, in his seminal work “Modern Practical Joinery”, defines a housed joint as “Sinking the end of one piece of wood completely into another without reducing it in thickness” (Glossary page 445)   Many classic texts on joinery will also characterize a “housed joint” as requiring preparation of only one member of the pieces being joined.  By this definition, a dado would be considered a “housed joint”, a sliding dovetail would not.  It should also be noted the dadoes were, more often than not, “splay nailed” to prevent them from loosening.

Perhaps the most recognizable “housed” joint is that used in “housed stair stringers”.  Anyone who has ever opened up an old, housed staircase is first struck by the fact that both treads and risers are wedged into place.  The wedging allows both pieces to be tightly seated into their housings.  Housed joints were also commonly used in architectural fitments that were shop built, then assembled on site.  And, they were also widely used in furniture construction.  However, these would have been structural joints and hidden from view by finish surfaces or mouldings.

The point of this post is not to simply engage in “word play”.  It is to caution joinery devotees to make their joint selections based, primarily, on function.  Beauty or the high level of skill required to make the appropriate joint should be an “added benefit.”  Bird’s Beaks and Wedged Scarfs are both beautiful and challenging to manufacture and, in the right application, are superb in function.  Both are generally covered by lead or tile.


Walnut COD – In time for Christmas?

Posted June 19, 2016 by D.B. Laney
Categories: Uncategorized

Tags: , , ,

This whole project started as an experiment in cutting ogee bracket feet on the band saw using a support block (2013) as opposed to the usual method of stock removal done by means of “kerfing” and planing.

012

I assembled a base then proceeded to trip over it every time I turned around for the next year.  My wife suggested that we needed another book case (the result of our mutual bibliophilia).  I decided to build something with existing stock and to do the work using only hand tools.  It quickly became obvious that the case was much too deep for use as book case.

004

After some pondering, I realized that the carcase could be modified to fit the dimensional envelope commonly associated with a small chest of drawers.  (Bear in mind there are no plans being used here, just what’s going on in my head.)

007

The case was cut down to an appropriate height.  Top rails were dovetailed in place.  Sliding dovetails were “let in” to carry the drawer rails.

244

Mortise and tenon joints are used for the drawer bearers.  These are left “loose” to accommodate movement.

001

Drawer fronts were rabbeted to accept both cross banding (quarter sawn white oak) and cock beading. Then half blind dovetails were let in.  Through dovetails are used on the rear of the drawer assembly.

134

135

Drawer bottoms were planed to thickness.  Only the “show side” is planed smooth.  The bottom surface was left with the telltale marks created by a highly crowned fore plane.  Rebates were cut to fit the slots and the bottom was beveled.  This is “good practice” as it reduces the “plane of weakness” at the edges.

036

The next step was to fit the brasses.

112

The cherry cock beading was treated with an iron acetate solution made with 15% vinegar (available at traditional butcher shops where it used for marinating; the label very clearly states that this product is not to be consumed undiluted).  Normally, if I was attempting to ebonize cherry I would pre-treat the wood with a tannic acid solution.  This method turns cherry “dead” black.  But this time I was looking for a very dark brown so I used only the iron acetate solution.  After the precipitate was buffed away, the surface was a mottled, deep brown that allowed the “flecking” common to cherry to show through. When oiled, the beading has an almost “leather like” look.  A happy accident.

031

The drawer fronts were “washed” with shellac to prevent any “bleeding”.  The cock beading was then fitted and glued in place using liquid hide glue (modern version).  Painters masking tape provides sufficient clamping pressure.  The tape was removed after forty-five minutes to prevent residue that would hinder final finish application

134

Back boards (ceilings) were planed, fitted, painted with a wash of barn red milk paint (real lime and casein version) then attached with cut nails.  (As the ceilings are not “show wood” the fore planed surface was sufficient.)

018

The base and case had previously been dyed with a mixture of household ammonia and walnut husks. This covered a small amount of sapwood that was present and “evened” out the color differential between the base and case.  (The variety of color in walnut, even in boards cut from the same tree, can be startling.)

137

The entire unit was then given three coats of Minwax Antique Oil (in reality a synthetic wiping varnish), as it dries more quickly than boiled linseed oil, especially as seasonal humidity increases.  Now, all I’ve got to do is nail up the base molding, make and attach the top.  I might actually get it done by Christmas!

I’m hoping my friend, Mr. Plane, will weigh in on where the project might fall on the “period style” scale. I’m guessing “sorta-kinda” Georgian.


It’s how well you work fast!

Posted May 8, 2016 by D.B. Laney
Categories: Uncategorized

Tags: ,

A friend is working on his 1894 Sears Kit Home.  (Absolutely beautiful home, by the way.)  He asked if I might be able to make a couple of replacement sills for him.  “Of course” says I, “I can whip up a sill in my sleep, with one hand tied behind my back.”  Now that statement may smack of hyperbole, but old sill profiles are fairly easy to duplicate on a table saw.  “Easy”, if you have a right/left tilt saw or know what “datum A” is (the base surface for measurement; “register”, si vous préfères.)  Unfortunately, I have an old left tilt saw and these particular sills had not only the common angles that you’d associate with this component, rebates and ploughs were also required.  I almost immediately concluded that it would be far quicker to make them by hand, especially since there were only two required.

Basically, it was a matter of sketching the profile onto the blank then running guidelines.  Major stock removal was done with a carpenters axe.

015

016

017

After the axe work was complete, the details were incorporated and some additional planing was required.  This was a clear case of “appropriate” technology being the very best choice.  It would have taken twice the time to do the job with power tools. And, it smells like Christmas in the shop.

If you want to see what craftsmen can do with axes you should visit Roald Renmaelmo’s blog.  The Northern and Central European traditional carpenters are absolute masters with an axe.  If you have a little extra time, explore some of the links from Roalds site, there’s a lot of fascinating stuff going on.

So long Buddy

Posted May 6, 2016 by D.B. Laney
Categories: Uncategorized

Yesterday wasn’t a good day.  Our old Golden Retriever, Wu Ming had to be put down.  He, like many Goldens, succumbed to hemangio sarcoma.  He answered to many names.  But usually it was simply “Boy.”

Wu Ming was born in Beijing China and emigrated to the US when he was about a year and a half old. For a long time he understood his commands in Chinese only, but ultimately he became bilingual.  It would be hard to imagine a more gentle being.  He was an extraordinarily good listener and never criticized.  He will be sorely missed by all those who knew him.

039

010

075

103

What, exactly, is a register chisel?

Posted April 19, 2016 by D.B. Laney
Categories: Uncategorized

Ask ten woodworkers to explain what they mean when they use the term register chisel and you’re apt to get ten different answers.  Some people will refer to them as “registered” chisels, indicating that the tools have been placed on a list hosted by some higher authority.  Others might tell you that the tool was manufactured under the terms of a Royal Patent.  As Churchill said, it’s rather “a riddle, wrapped in a mystery, inside an enigma.”

Among the many meanings of the word register, Webster gives these for our consideration:

  • to make or adjust so as to correspond exactly,
  • to be in correct alignment, or register 

Many craftsmen of the bygone era (including carpenters, millwrights and machinists) would use the word register to indicate a surface that must mate exactly with another or one to be used as a reference datum for measurement.

Register chisels have these characteristics;  square sided, thickly made and only slightly tapered (is at all) in section, hooped, ferruled (typically with a shock washer),

001

the handle is parallel to the back and the back is flat.

003

The flat back is very specific to a register chisel.  It allows for heavy (minimal clearance angle) cutting on a “register” i.e. cleaning up mortise cheeks after boring or a gain.  Large surfaces which require flattening, i.e. bridles and laps can be accomplished with socket firmers or slicks.  These tools do not (typically) have flat backs and handles are set above the tool’s center axis.  Socket firmers are either “lightly” driven with a mallet or pushed for paring.  Slicks are only pushed.

005

007

While a flat back would seem to be the norm, most tools warp during the hardening and tempering process.  For most chisels, a slight warp (in the right direction) isn’t a problem.  However, grinding or some other method of straightening is required to insure a perfectly flat back, as on a register chisel.

So this is the explanation that was given to me nearly sixty years ago.  I’m going to stick with it unless or until someone gives me a better one.


Slow and steady, wins the race?

Posted April 18, 2016 by D.B. Laney
Categories: Uncategorized

Having no deadline is not, necessarily, a good thing.  Yes, it’s nice not to answer those calls from customers wanting to know where “I’m at” on their projects.  But when you’re doing something for your own consumption, it’s easy to get “side tracked.”  Such is the case with the chest of drawers I’ve been working on for the quite some time.  The good news is, I’m making progress, after a fashion.

The drawers are all “roughed in.”

033

The drawer bottoms have been left scrubbed as the backboards (ceilings) will be.  (Cabinet makers and Carpenters working with hand tools would rarely finish plane surfaces that weren’t registers (reference datum) or show wood.)

036

So, now all I have to do is glue the carcass together, nail up the base moulding, install upper kickers, dye and apply the cockbeading, manufacture the top, stain and finish everything and install the hardware…

Maybe it’ll be done in time for Christmas (BTW, I missed the last Christmas deadline).

Obviously, the tortoise had no deadlines either.  Good old Aesop.

How long does it take to carve a fan?

Posted April 12, 2016 by D.B. Laney
Categories: Uncategorized

That’s the question.  How long does it take to carve a fan, the type you might see on a high or low boy (chest on chest or dressing table).  Well, the simple truth is, probably, a couple of hours.  But the reality is that, unless you are a “constant carver”, it’s going to take considerably more time than that.

Carving is a skill and skills have to be practiced.  The carving of a simple fan might take two hours.  But getting “prepped for it” might take twenty.  Patience.  Commitment.  Persistence.  If these things are not a part of your “kit”, stick to bird houses.

137

Just when I was ready to go back to work

Posted April 11, 2016 by D.B. Laney
Categories: Uncategorized

Mid April in Ohio is, usually, a great time to get back out to my, essentially, unheated shop.  While visions of cleanliness and order rolled around in my head, Mother Nature was playing a cruel trick. Saturday morning we awoke to this:

093

094

095

097

The last picture shows a number of telecom wires supporting a good size limb (this limb is but one of many).  Whether or not you believe in climate change, I suggest that this is not what we expect April in Ohio to be like.  Suffice it to say that the only sawing I’ll be doing for the next few days will be that accomplished with something attached to a gasoline engine.  No wonder it’s so hard for me to get anything finished!

Bannister back chair – getting to the center of things

Posted March 19, 2016 by D.B. Laney
Categories: Uncategorized

centers

After cutting the rear post from the stock, it became clear that we were dealing with a little bit of warp. We determined the position of the “centers” of the cylindrical section to be turned, prior to attaching the counterweight.  The illustration above shows the centers on one plane (the next centers were marked on the adjacent plane or 90 degrees from the first).  Then the lines were projected to find the “true” centers.

The first task was to create a “roller path” for the wheels of the steady rest to ride on.  This needs to be done carefully, as significant deflection will be encountered.  After the steady rest was mounted, we found that deflection was nearly eliminated.  The “working length” of the workpiece was shortened from 41″ to 24″, stiffening it considerably.  Our effective diameter is approximately 8″.  (Several posts back I indicated that the effective diameter was 16″.  My mistake.  Old age setting in…)  So we’ll be turning the details at approximately 1000 rpm.  Note that we’ve attached the counterweights with screws, backed up by several layers of duct tape, just in case…

In the spring an old man’s fancy turns to….

Posted March 13, 2016 by D.B. Laney
Categories: Uncategorized

Yesterday, a friend mentioned that he hadn’t seen any posts lately.  He assumed that I was looking forward to getting back out to the shop with the onset of spring.  He wondered what projects I was currently working on.  I told him that I’d been engaged in a somewhat different project, as of late.

117

This should be proof positive that even at seventy, you can still act like a kid.  Back to woodworking soon.


Bannister back chair – preliminaries II

Posted February 23, 2016 by D.B. Laney
Categories: Uncategorized

Tags:

Many older bannister back chairs have straight rear posts.  Ugh!  You probably won’t want to sit for long in one of these.  An appropriate description of the experience would be discomforting.  So we’ve opted to replicate one of the types that incorporates a slouch angle in the rear post.

The long excepted method of creating this type of rear post is by cutting a blank that includes the angle, counter-weighting the blank, turning the upper portion of the post, then sawing away the waste to reveal the final shape.  Some chair makers create rather sophisticated counter-weighted fixtures when making multiple posts as this allows for the best yield in stock.  One of the drawbacks of these fixtures is that they increase the overall length between centers.  The bulk of these posts are between 45″-50″, which is, already, a “stretch” for most lathes.

Curmudgeons are notorious for not, necessarily, believing everything they read.  So we decided we’d do a little testing before we jumped right into the “good wood.”  Who knows, we might find a short cut, maybe something like the fabled “Northwest Passage.”

So we cut our blank and counter-weight:

065

We mounted the blank without the counter-weight.  Our test lathe is an extended Powermatic 35-20, plenty of weight, plenty of power.  Our thinking was that, as in turning off-set legs, we might be able to turn the “out of balance” piece at a slower speed.  The effective diameter we’re working with is about 16″, so an rpm range of  350 to 550 would seem to be a reasonable starting point.  In short order, we realized that we were fighting deflection as well as an out of balance problem.  So much for that “short cut.”  The counter-weight was mounted.

A word of caution here.  Having been on the receiving end of “things coming apart” on the lathe, please insure that any counter-weights are securely fastened.  For this trial, we simply screwed the weight into the waste stock.  However, the weight could be “rubbed on” with glue, fastened with banding or in any of a number of other ways.  My guess is that we’ll screw mount and throw a couple of wraps of “hundred mile per hour” tape on it, just for peace of mind.

Needless to say, the mounting of the single counter-weight greatly improved stability.  After some discussion, we agreed that by mounting two additional weights at 90°, right and left of the existing weight, the balance might be further improved.  We may give this a try, “just for fun”, as we’re not working to any particular deadline.

072

It should be noted here, that on most of the rear posts (on original chairs) there is a cylindrical section immediately above the lower, angled section of the post.  When I first noticed this feature, I wondered if some of these original posts might have been mortise and tenoned together (thinking that this would greatly simplify the task of turning).  So I conferred with my friend, Jack Plane, www.pegsandtails.wordpress.com and he assured me that only late 19th and 20th century replicas (of the “less expensive” variety) were ever constructed in that fashion.  The “real McCoys” were turned in one piece.  It’s clear that the cylindrical sections on the original posts was a roller path for some type of “steady rest” device.  Such a device will shorten the effective length and greatly reduce deflection.

More to follow.


Bannister back chair – preliminaries I

Posted February 16, 2016 by D.B. Laney
Categories: Uncategorized

Tags:

Call me cautious, but before I jump into a new project, I like to practice the skills and techniques that are going to be used, if they’re not routine.

The Bannister back chair gets it name from the “halved” balusters, used as splats.  These are usually made by “split” turning.  When prepping stock for split turning, most turners will glue sections (half of the finished section thickness) together, separating them with “brown” or craft paper.  Upon completion, the work piece is rived, yielding two finished “halves”.  This process works well for items that are to be used as surface decorations.  However, it is not unusual for some grain tearout to occur (especially with modern glues).  This is not a problem if the inner surface won’t be exposed in its final use, but the inner surface is the “show” surface on bannister back chairs.  Smoothing the show surface after riving will reduce the detail diameters, literally changing the shape of the baluster.

Another method is to cut the lengths somewhat longer than required and fasten them together using screws.

055

Care should be taken to insure that the inner faces are in complete contact (any minor warp to the inside).  The drive spur should be positioned so it will not act as a wedge and a “cup” type center will be very helpful.  The additional length may make dealing with deflection a bit more challenging, but the final product should be well worth the effort, especially in this application.

056


Thursday morning curmudgeons – what’s next?

Posted February 14, 2016 by D.B. Laney
Categories: Uncategorized

Tags: , , ,

Most of you know that Les, Scott and I (Dennis) have been getting together on Thursday mornings for the last year or so.  The three of us have been involved with woodworking for a very long time and we all had noticed that we were exhibiting symptoms of a problem(s) that can befall anyone who practices any part of the ancient and honorable art of “wood butchery.”

Most woodworkers involved in the “bench work” part of the craft quickly realize that it can be a very solitary existence.  Now solitude, in and of itself, can be a wonderful thing.  The ability to withdraw into the peace of the workshop is a great gift.  But, like all great gifts, solitude has a few “down sides” to consider.  When working by oneself for a long period of time, it’s very easy to get into a “rut”.  You might find that everything you’ve been doing has begun to look “the same”.  You’re apt to find that you’ve fallen into the habit of talking aloud to yourself…  And, no matter your level of expertise, you may find that your skills are not being challenged.

So, the pact was made.  We’d get together once a week for the purpose(s) of sharing our experience(s), assisting each other, learning and challenging one another.  And of course, our sessions include a fair amount of laughter, both between and at ourselves.  We’re living proof that no matter your level of expertise, you can still “screw it up.”  Experiencing the fraternity of craft is a real treasure.

The three of us continue with our own, individual, projects.  But last Thursday, we took a measure of some of the projects that we want to accomplish collectively.  Some are incomplete projects that have been around for awhile and some are brand new.  Here’s what we’re thinking:

A Spanish footed tavern table.  This is a project that’s sitting around (nearly completed) for awhile.  My guess is that we’ll wind up making several of these;


004

Metropolitan Museum of Art collection

A Spanish "Footed" tavern table

A Spanish “Footed” tavern table

A Chippendale style side chair with a pierced and carved splat;

26Chippendale-sidechair400

Partially finished details

Partially finished details

A bannister back chair in the Massachusetts style;

e6631781a61a3a9e8f70a7ab1953fe33

Metropolitan Museum of Art

and, a Queen Anne Highboy;

09252

Lower case of a Queen Anne highboy

Lower case of a Queen Anne highboy

We shouldn’t run out of work (or challenges) for awhile.


Glad that’s finished!

Posted February 13, 2016 by D.B. Laney
Categories: Uncategorized

Who’d thunk that a simple little hall table would present such a challenge?  But it did.  Truth is, when you’re working without a set of dimensional rules, it can be difficult to achieve “flow and balance”. Prototyping becomes a requirement.  If nothing else, this project proved to Les, Scott and me that the skill of someone like Nakashima can’t be overstated.

074

The Bocote top was filled, finished with blonde shellac, then waxed.  Several checks were “stopped” with Pearwood “butterflies.”  The construction is traditional, utilizing mortise and tenon and sliding dovetail joints, which made for a very strong, rigid base.  A small chamfer at the bottom of each leg increases the sense of “lightness” (and could prove very useful if, at some point, “leveling” is required).  The Ash base was finished with several coats of boiled linseed oil (BLO), which gives the wood a beautiful light “golden” hue.  We opted not to stain or glaze the base, as this would have accentuated the “grainny” nature of the ash and we wanted the base to compliment, not compete with the top.

I, for one, doff my hat to those crafts people who consistently and artistically work in the “chaos of contemporary”.  It’s like “flying without a net.”  I think I’ll return to the “disciplined comfort” of period furniture for awhile.  But…a little chaos, now and then, might not be a bad thing.


Two little “groovin’ cuties”

Posted January 31, 2016 by D.B. Laney
Categories: Uncategorized

Tags: , , , , ,

Every woodworker has favorite tools.  Some are favorites because they have a broad range of uses, like a reciprocating saw.  Others have very limited uses, but they just feel “right” every time you pick them up. Some are simply wonderful examples of the toolmaker’s art.

Two of my favorites are plough planes, a Record 050 and a Record 043.  (If this were a discussion about an American made plane, I would have spelled it plow.)  The 050 is a “standard” size.  The 043 is a small, single-handed plane, for fine work.  Both are a joy to use.

011

013

I’ve noticed that when most folks use a plough (or any moulding or specialty plane) for the first time, they’re inclined to position it as you would a jointer, at the “beginning” of the cut.  WRONG!  While it may seem counter- intuitive, specialty planes should be started near the “finish” of the cut.

008

009

Starting at the “finish” effectively shortens chip length.  Shorter chip length greatly reduces the potential for tear out.  Also, taking shorter chips helps when encountering changes in grain direction, knots or other anomalies in the stock.  It also requires less energy and makes the plane easier to control.  This is especially important when using any plane that is fitted with a movable fence or other type of lateral stop.  Happy ploughing (plowing).


Old dogs, New tricks – continued

Posted January 28, 2016 by D.B. Laney
Categories: Uncategorized

Tags: ,

Finishing touches are being completed.  The slab is receiving several (three to four) coats of 1 pound cut shellac (super blonde) which will act as a sealer.  After a final “rubbing”, a good waxing will be applied. Several butterflies were inlaid to to stop checks.  The butterflies were made from Swiss Pear, which is extra-ordinarily fine grained and tough.  Also, it’s very similar in color to the Bocote sapwood, when finished.

028

We departed from our normal method of inlaying by hand and opted to use a commercial template and a Whiteside “inlaying” kit to make the mortises and butterflies.  A word of caution:  make sure that you double check the set up when changing from mortising to cutting the inlays.  Enough said!

The base has really exceeded our expectations in terms of stability.  The use of sliding dovetails to join the short, lower stretchers to the main, lower stretcher has help to create a very strong, rigid structure while maintaining a “light” look.  The base, which is ash, will be finished with four coats of “rubbed” Boiled linseed oil (the first being thinned with turpentine).  The BLO gives the ash a lovely golden color.

026

In a week or so, we’ll be ready to assemble the top and put this table to work, standing guard in the hallway.  For anyone who’s curious about dimensions, the table height is 30″